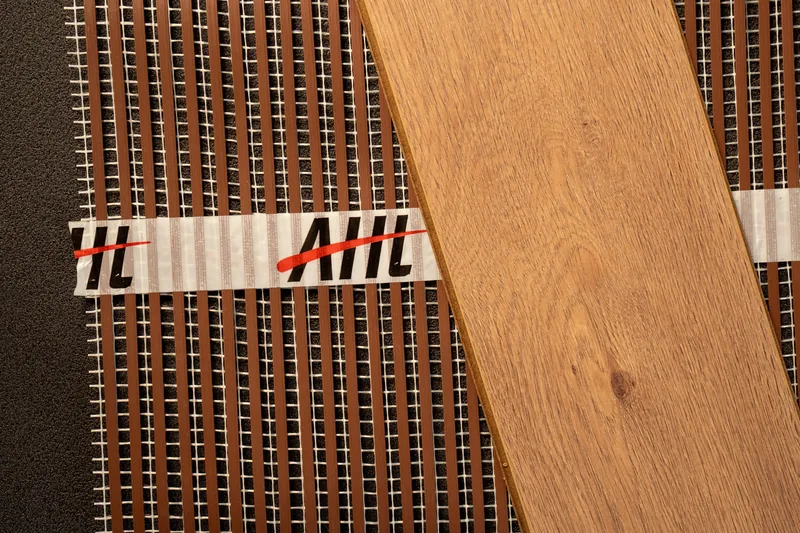
This guide covers the whole job: planning and measuring, preparing the subfloor, laying the ribbon, choosing an underlay that works with underfloor heating, and fitting the boards over the top. Planning and laying are DIY-friendly. The final electrical connection is not. A qualified electrician must make it, in line with Part P of the Building Regulations and BS 7671.
EkoBuild is an AHT amorphous ribbon specialist based in Flint, North Wales. The system carries a manufacturer warranty for the Ribbon, with the period and conditions stated in AHT’s supplied certificate. Stuck at any point? Call us on 01244 822 918.
Tools and materials checklist
- AHT ribbon heating mats, 0.5m or 1m wide, to match your plan
- touch screen thermostat and a compatible floor probe; confirm the supplied sensor contents
- Therm-All insulation packs (each covers 10m2)
- Underlay marked as suitable for underfloor heating (low tog)
- Your chosen wood or laminate flooring, rated for underfloor heating
- Tape measure, pencil and paper (or use the room designer tool)
- Strong tape for fixing insulation and mats in place
- Knife or scissors for trimming insulation (never the heating ribbon)
- Vacuum and brush for subfloor prep
- Flooring spacers for the perimeter expansion gap in the boards (the ribbon needs no edge gap)
- A qualified electrician for testing and the final connection
Planning and measuring your room
Get the planning right and the rest of the job is straightforward. Measure the room, sketch it on paper, and mark anything fixed: kitchen units, built-in wardrobes, a hearth. Do not plan heating under fixed units or furniture that sits flat to the floor. Heat needs to escape upwards. The ribbon itself needs no gap around the edges of the room, so run it right up to the walls: your board expansion gap sits in the flooring layer above it, not in the heating.
Ribbon can provide primary heating when the usable output from the fitted mats meets the room’s calculated heat loss at the permitted floor temperature. Around 70–80% useful coverage is a planning aim, not a pass/fail test. Confirm the complete heating design before removing existing heating.
Then match mats to your plan. The ribbon comes in two widths. 0.5m wide mats cost £50 for the shortest 0.5m-wide mat (1.2m long) and come in lengths from 1.2m to 7m. 1m wide mats cost £65 for the shortest 1m-wide length and come in lengths from 1m to 3.5m. Both output 150W per square metre. Combine widths and lengths to fill the space, because the ribbon must never be cut to fit.
If you would rather not do the maths, use our room designer. Draw your room and it gives you the whole-mat layout and stock estimate.
What you need
The full kit list is above. The short version: ribbon mats to match your plan, Therm-All insulation to push the heat up into the room instead of down into the subfloor, the touch screen thermostat with a compatible floor probe (confirm what is supplied), and an underlay marked as suitable for underfloor heating. Everything else is basic kit you probably already own. Standard UK delivery is free when the goods total is £150 or more. Check special destinations with EkoBuild and see the current delivery terms.
Doing the whole job?
The fitting guide covers room planning, floor constructions, Ribbon fitting rules, controls and electrical checks, performance, warranty conditions and current products.
Download the fitting guide (PDF)Step-by-step installation
Here is the full sequence for a floating wood or laminate floor. Take your time on the first three steps. A clean, flat, insulated base makes everything after it easier.
- Plan your layout. Measure the room, mark fixed obstructions and choose whole stocked mats that physically fit. Ribbon can provide primary heating when the usable output from the fitted mats meets the room’s calculated heat loss at the permitted floor temperature. Around 70–80% useful coverage is a planning aim, not a pass/fail test. Confirm the complete heating design before removing existing heating.
- Prepare the subfloor. Clear the room and vacuum the subfloor. It needs to be clean, dry and flat, with no protruding nails, screws or sharp debris that could damage the ribbon.
- Lay the insulation. Cover the full measured insulation area with the specified Therm-All insulation and tape the joints as instructed. Insulation directs the heat up into the room instead of down into the subfloor.
- Roll out the ribbon mats. Position each mat following your plan and tape it down flat. Never cut, fold or overlap the heating ribbon.
- Route the leads and floor probe. Run the connection leads towards the thermostat position on the wall. Place the floor probe within the heated area, following the instructions supplied with the thermostat.
- Have the mats tested. Ask your electrician to test each mat before anything covers it. Faults are cheap to fix now and expensive to fix under a finished floor.
- Check the approved underlayer arrangement. Follow the board manufacturer’s approved heated-floor construction. Keep the specified insulation beneath the Ribbon and only add a compatible underlayer above it if that construction requires one. Do not add an unnecessary insulating layer that blocks heat.
- Fit the wood or laminate boards. Float the boards over the underlay in the normal way, leaving the expansion gap your flooring manufacturer specifies around the perimeter. Never nail or screw through the floor into the heated area.
- Let your electrician make the final connection. A qualified electrician must connect the mats and thermostat to the mains, in line with Part P of the Building Regulations and BS 7671. Laying the system is DIY-friendly. The electrics are not.
- Heat up gradually. Once signed off, run the system at a low temperature first and raise it gradually over several days. Set the thermostat floor limit to match your flooring manufacturer's maximum surface temperature.
One rule sits above all of these: never cut, fold or overlap the heating ribbon. If a mat does not fit, change the layout or the mat size, not the mat.
Advice for wood and laminate floors
Wood and laminate behave differently over heat, so a few checks are worth making before you buy boards.
- Check the boards are rated for underfloor heating. Most laminate and engineered wood is, and the packaging or datasheet will say so. If it does not say, ask the manufacturer before you buy.
- Engineered wood is the simpler fit. It lays straight over the ribbon with no battens, at up to 22mm thick. Solid wood works too, but it has to go on battens: never lay solid boards directly onto the ribbon.
- Respect the maximum floor surface temperature. Flooring manufacturers state a temperature limit for their boards. Set the floor limit on the thermostat to match it, using the floor probe. That is exactly what the probe is there for.
- Acclimatise the boards. Leave the packs in the room before fitting, for as long as the flooring manufacturer directs, so the boards adjust to the room's temperature and humidity.
- Leave proper expansion gaps in the boards. Wood and laminate move with heat and humidity, so leave the perimeter gap your flooring manufacturer specifies, use spacers while fitting, and cover the gap with skirting or beading. This gap is a flooring requirement in the board layer. The heating ribbon underneath needs no gap around the edges.
- Go easy on thick rugs. A heavy rug over a heated area traps warmth beneath it. Keep rugs thin, or keep them off the heated zones.
Common mistakes to avoid
- Cutting the ribbon to fit. Never do this. Change the mat length or width instead. The room designer removes this problem at the planning stage.
- Using standard insulating underlay. A thick underlay blocks the heat you are paying for. Use one marked for underfloor heating with a low tog rating.
- Skipping the insulation underneath. Without it, a share of your heat warms the subfloor instead of the room, and running costs climb.
- Heating under fixed furniture. Trapped heat helps nobody. Plan around units and flat-bottomed furniture.
- No test before the boards go down. Always have the mats tested while you can still get at them.
- Full heat on day one. Bring the temperature up gradually over several days and stay within your flooring manufacturer's limits.
- DIY-ing the mains connection. The final connection is a job for a qualified electrician under Part P and BS 7671. No exceptions.
What it costs: a worked example
For a 4m × 5m lounge, draw the measured outline and exclusions in the Room Designer. Seven-metre pieces cannot fit either straight dimension and must not be cut. The planner chooses whole stocked mats that fit, preferring 1m widths where possible.
For a suitable floating laminate or engineered-wood assembly, the full 20m² insulation area needs two 10m² Therm-All rolls before any extra allowance for cutting waste. The current quote prices the fitted mats, insulation and allocated controls. Solid timber needs its separately approved batten construction.
The resulting product quote excludes the flooring, additional fitting materials and electrical work. Coverage alone does not establish whether it can be the room’s primary heating.
Still deciding? Read underfloor heating under laminate or under engineered wood for the build-up heights and temperature limits.
Next steps
Ready to plan your room? Draw it in the room designer and you get the whole-mat layout and stock estimate straight away. Browse the full range in the shop, or start with our electric underfloor heating guide if you are still weighing up options. Wondering whether it can replace your radiators? Read electric underfloor heating as primary heat, and see underfloor heating with no screed for why no self-leveller is needed. If you would rather talk it through first, call us on 01244 822 918. We are happy to help you plan the room before you spend a penny.
FAQs
Can you fit electric underfloor heating under laminate flooring?
Yes. The AHT ribbon system is 1.8mm thin and lays directly under a floating laminate floor, with no screed or self-leveller. Check your laminate is rated for underfloor heating and pair it with a low tog underlay marked as suitable for heated floors.
Do I need screed or self-leveller under wood or laminate?
A suitable floating laminate or engineered-wood assembly can be fitted without screed or self-leveller. The Ribbon is 1.8mm thick, but insulation, any specified underlayer and the boards determine the complete build-up. Confirm the floor product and construction; solid timber normally needs its separately approved batten method.
Can underfloor heating under wood or laminate be my main heating?
Ribbon can provide primary heating when the usable output from the fitted mats meets the room’s calculated heat loss at the permitted floor temperature. Around 70–80% useful coverage is a planning aim, not a pass/fail test. Confirm the complete heating design before removing existing heating.
What underlay should I use with underfloor heating?
Use an underlay that states it is suitable for underfloor heating and has a low tog rating, so heat passes through instead of being blocked. Standard thick insulating underlays are not suitable. Your flooring manufacturer will usually recommend a compatible product.
Do I need an electrician to install it?
For the final connection, yes. Planning and laying the mats is DIY-friendly, but a qualified electrician must make the mains connection in line with Part P of the Building Regulations and BS 7671. They should also test the mats before the flooring goes down.
See the heating and flooring samples
A closer look at the demonstration samples. Confirm the complete floor build-up, controls and installation requirements for your chosen products.