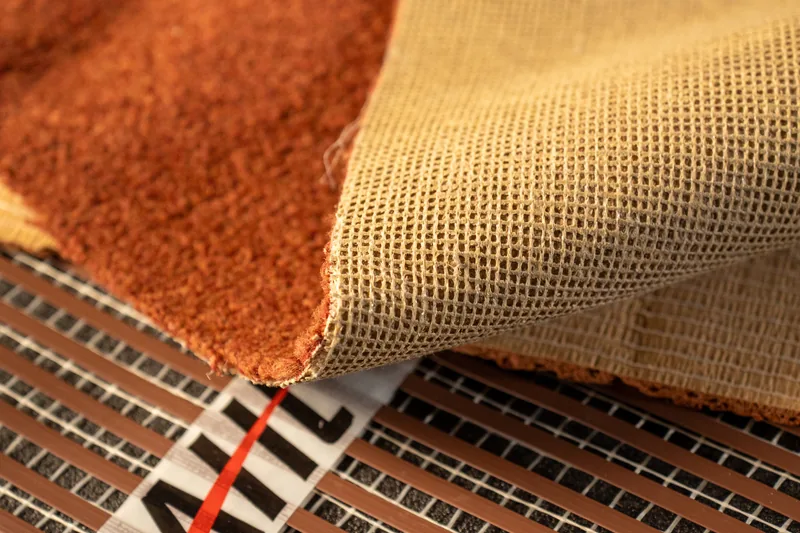
Yes, you can. The EkoBuild Ribbon is 1.8mm thick and is installed as a dry system beneath compatible carpet and underlay, with no screed, no self-levelling compound and no overboard. Check the exact carpet and underlay specifications: underlay no higher than 0.8 TOG, and combined carpet plus underlay no higher than 2.8 TOG. The complete construction and heating design must also be suitable.
Check the complete floor construction
Underfloor heating systems use different floor constructions. Some water-based systems embed pipes in screed; others use dry panels. Electric products also have their own specified layers and limits.
Carpet suitability depends on the complete system, carpet and underlay specifications, floor temperature limits and heating design. Do not choose solely by the thickness of the heating element.
Use the floor-specific instructions for the product you are buying. The Ribbon construction described below is for compatible carpet and underlay; it is not a generic fitting method for every heating system.
How the Ribbon is different
The EkoBuild Ribbon is 1.8mm thick. It is taped down with EkoBuild's own high-tech tape, over suitable insulation. We use 6mm Therm-All thermal and acoustic insulation for compatible floating floors.
Over the Ribbon goes a 0.8 tog rubber underlay rated for underfloor heating, and then your carpet.
There is no screed. There is no self-levelling compound. There is no overboard. And there is no waiting for a wet layer to dry before the carpet can be fitted. Once the system has been installed, connected and tested, the flooring goes down.
That is what makes it useful in a renovation, or in a room that is already finished, where you do not want to raise the floor or turn a heating upgrade into a building project.
What the finished floor build-up comes to
| Subfloor | Levelled, clean and dry |
| Insulation | 6mm Therm-All, which is thermal and acoustic insulation for compatible floating floors |
| Heating | The Ribbon at 1.8mm, taped down with EkoBuild's own high-tech tape |
| Protection | A 0.8 tog rubber underlay rated for underfloor heating |
| Floor finish | Compatible carpet |
| Total added height | Add the 6mm insulation, 1.8mm mat and the actual compatible carpet and underlay thicknesses. |
| Screed or self-leveller | None |
| Supplier paperwork | Supplier paperwork includes Nemko certificate P15220551, dated 3 December 2015, for AHT floor-heating elements, Class II, tested against EN 60335-1, EN 60335-2-96 and EN 62233. Ask EkoBuild for the documentation applying to the product supplied. |
The tog rule, and the thing people get wrong
The carpet and the underlay both have to let enough heat through. Both have a tog rating, which is simply how strongly a material resists the movement of heat. Stack up too much of it and the warmth stays under the carpet instead of coming into the room.
The rule is a combined carpet and underlay tog of 2.8, no higher.
Ask for the manufacturer’s tested TOG rating before buying. Appearance or thickness alone does not establish the carpet’s thermal resistance.
Check the carpet and underlay as a combined specification, including thermal resistance, temperature limits and compatibility with the specified heating construction.
Can it be the room's main heating, or is it just a warm floor?
This is the real question, and it is the one that separates the Ribbon from a comfort product.
The Ribbon’s nominal output is 150W per m² of fitted mat. Around 70–80% coverage is a planning aim, but primary-heating suitability depends on room heat loss, carpet and underlay resistance, and temperature limits.
That means you are not putting one small warm section beneath your feet. You are using the available floor to create a large heat source capable of warming the room above it.
Lower coverage needs a room-specific heat-loss and output check; it does not automatically require an infrared panel
The property, the insulation and the flooring still have to be suitable. But the system itself is designed to do more than take the chill off.
How quickly warmth comes through carpet
Warm-up time varies with the floor construction, starting temperature, control settings and room conditions. Initial warmth at the surface is different from heating the whole room; a demonstration time is not a guaranteed result for your installation.
Getting the controls right
The room thermostat controls the selected room temperature. A correctly positioned floor sensor supports a commissioned floor-temperature limit; a setting alone does not guarantee the temperature at every point. Follow the supplied controls instructions, with the sensor between two Ribbon runs rather than on top of one.
The thermostat goes 1.2 to 1.5m above the subfloor, in the room it controls.
The final 240V connection must be made by a Part P qualified electrician and certified to BS 7671. Confirm the electrical design, protection and testing with the electrician before installation; only undertake preparation and floor fitting you are competent to carry out.
What actually goes wrong under carpet
Check these parts of the complete floor construction and controls when investigating poor performance. Carpet compatibility depends on the exact products and installation, so have the cause assessed rather than assuming it.
- An unsuitable carpet or underlay, so the heat never reaches the room.
- Too little floor covered, so the system is fighting the room instead of heating it.
- Gripper rods nailed through the heating. Plan the Ribbon to stop short of the gripper line on every wall, and tell your carpet fitter the floor is heated.
- Controls installed in the wrong place, or the floor sensor sitting on top of a run rather than between two.
- Never put additional insulation, Kingspan, foam, beanbags or a mattress on top of the Ribbon. The heat has to escape upward. Trap it and the element keeps climbing
Related video
Watch the reviewed short clip and read its matching transcript. Use the current guidance on this page and the supplied product instructions for planning and fitting. Ribbon heating beneath carpet: video, captions and transcript.
See exactly what your room needs
Map your room in the free Room Designer for a whole-mat layout, coverage and stock price. Confirm room heat loss and the carpet build-up, then read the step by step fitting guide.
Underfloor heating under carpet FAQs
Can you put electric underfloor heating under carpet?
Yes. The EkoBuild Ribbon is 1.8mm thick and lays dry beneath compatible carpet with no screed, no self-levelling compound and no overboard. The carpet and underlay must stay within the tog limit.
What tog rating can my carpet and underlay be?
A combined carpet and underlay tog of 2.8, no higher. Over the Ribbon we use a 0.8 tog rubber underlay rated for underfloor heating. Ask for the manufacturer’s tested TOG rating; appearance or thickness alone does not establish thermal resistance.
Can underfloor heating under carpet be my main heating?
Yes, when the heating design confirms that usable output meets room heat loss with the chosen carpet and underlay. Coverage alone does not establish that. Lower coverage needs a room-specific heat-loss and output check; it does not automatically require an infrared panel
Do I need screed or self-levelling compound under carpet?
The Ribbon can be fitted in a dry carpet assembly without a traditional screed. Calculate the finished height from the 6mm Therm-All insulation, 1.8mm mat and the actual compatible carpet and underlay; a laminate example does not give the height of a carpet floor.
How long does it take to warm up through carpet?
Warm-up time varies with the floor construction, starting temperature, control settings and room conditions. Initial warmth at the surface is different from heating the whole room; a demonstration time is not a guaranteed result for your installation.
Do I need an electrician?
Yes, for the final connection. The final 240V connection must be made by a Part P qualified electrician and certified to BS 7671. Planning the layout, laying the insulation and rolling out the Ribbon are all DIY friendly.
See the heating and flooring samples
A closer look at the demonstration samples. Confirm the complete floor build-up, controls and installation requirements for your chosen products.